October 6, 2026

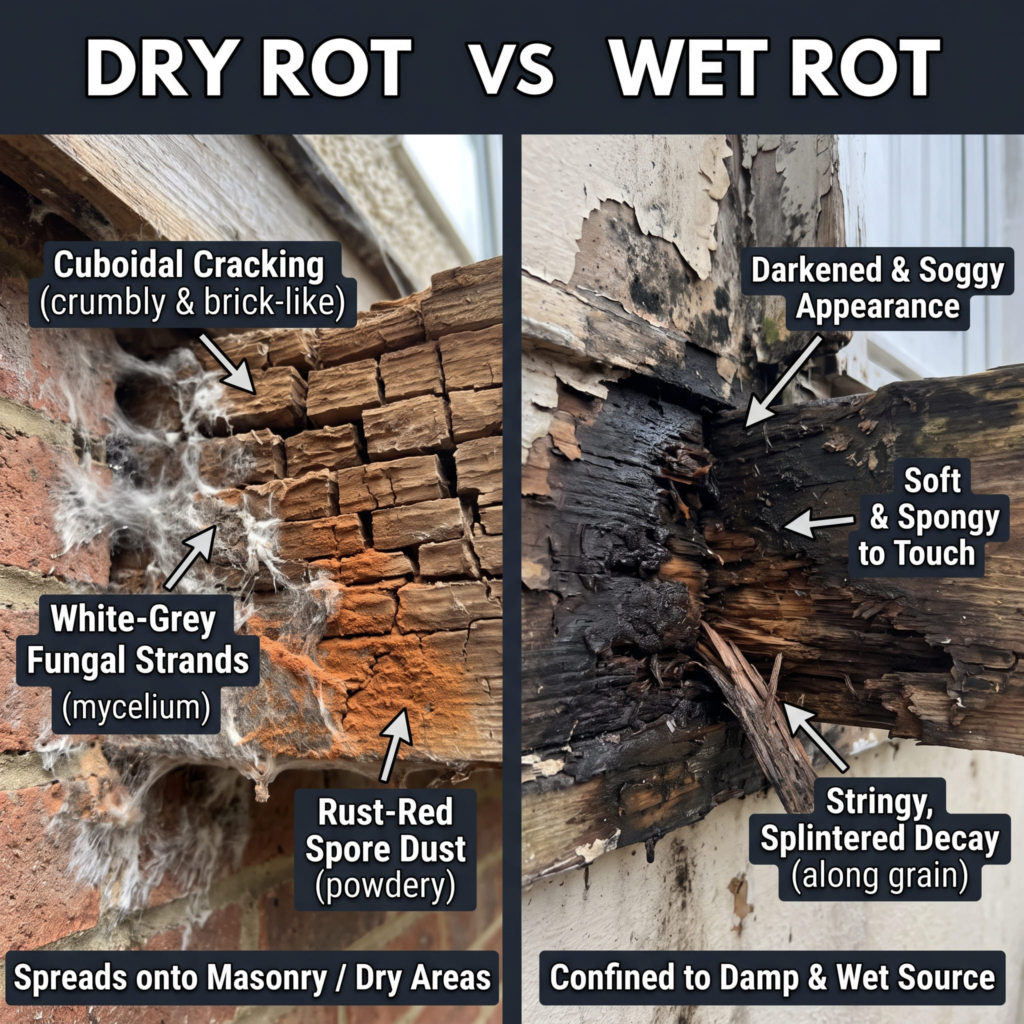
Dry Rot vs. Wet Rot: What Is the Difference

Dry Rot vs. Wet Rot: What Is the Difference A soft corner, peeling paint, open joint, or dark stain may look cosmetic, but it can point to a deeper moisture problem. Effective dry rot repair is not just about making the surface look better; it is about restoring sound wood and correcting why the area became wet. Homeowners often use the term dry rot to describe deteriorated wood found around the exterior of a house. The important practical issue is not the label; it is whether moisture has weakened the material and whether the source of that moisture has been corrected. What Usually Causes the Problem? Horizontal surfaces and exposed end grain absorb moisture more readily than well-protected vertical faces. That is why lower trim edges, sill ends, deck cuts, fascia joints, and post bases deserve extra attention during inspection. Signs to Look For Loose trim or fasteners: Movement may indicate that the wood around nails or screws has deteriorated. Damage below gutters or roof edges: These locations can point to overflow, leaking seams, or uncontrolled runoff. Musty odor near enclosed wood: An unusual odor can accompany chronic dampness in concealed areas. Dark staining or discoloration: Stains do not always mean rot, but they are a reason to inspect the area more closely. Soft or spongy wood: Wood that gives under light pressure can indicate that the fibers have lost strength. Open joints and failed caulk: Gaps around trim, windows, doors, and siding create direct paths for water. One sign by itself does not prove that the wood needs replacement. The goal of an inspection is to determine whether the material is still sound, how far any deterioration extends, and where the moisture is coming from. Why the Moisture Source Matters for Exterior Wood Horizontal surfaces and exposed end grain absorb moisture more readily than well-protected vertical faces. That is why lower trim edges, sill ends, deck cuts, fascia joints, and post bases deserve extra attention during inspection. Repair-versus-replacement decisions depend on how much sound material remains, whether the piece is structural, how the part is connected, and whether a partial repair can be detailed so it sheds water correctly. What a Proper Dry Rot Repair Should Address Open the damaged area carefully. Removing trim, siding, or finish materials exposes the true boundaries of the deterioration. Inspect nearby material. Adjacent boards and framing should be checked because decay can extend beyond the first visible spot. Repair or replace affected carpentry. The damaged section is rebuilt with appropriately sized and detailed material so the surface and support are restored. Seal and protect exposed surfaces. Cut ends, joints, and compatible repair materials should be prepared for primer, paint, sealant, or another protective finish. Identify the moisture source. Before new wood goes in, the repair should determine how water reached the area and what needs to change to keep it dry. Verify the finished water path. The final condition should allow water to drain away rather than collect against wood. Not every project uses every step, but the sequence is important: find the water path, expose the damage, remove unsound material, rebuild the affected area, and restore the protective details that help the exterior shed water. How to Reduce the Chance of Future Wood Rot Watch roof-to-wall and window transitions for staining that may indicate a flashing problem. Repair small gaps early. A narrow opening at a joint can become a repeated path for water. Keep gutters clean and confirm that water exits through the downspouts instead of spilling over fascia. Recheck previously repaired areas during seasonal maintenance to confirm the moisture source has not returned. Inspect caulk joints around windows, doors, trim, and siding and replace failed sealant with a compatible exterior product. Keep soil, mulch, and dense vegetation from trapping moisture directly against exterior wood. Maintenance does not guarantee that wood will never deteriorate, but it can reduce repeated moisture exposure and make small defects easier to catch before they become larger repairs. When to Call a Contractor If the area feels soft, the damage is near a window, door, roof edge, deck connection, structural member, or the same spot keeps failing after previous repairs, it is reasonable to have the area evaluated professionally. Opening the right section carefully can reveal whether the issue is limited to finish material or extends into surrounding framing. Need Dry Rot Repair? Early attention can keep a localized wood problem from turning into a larger carpentry repair. Elite Construction and Remodel can help identify what is damaged and what may be causing it. Company: Elite Construction and RemodelService: Dry Rot & Exterior Wood RepairArea: Sacramento Area

Dry Rot vs. Wet Rot: What Is the Difference Read More »
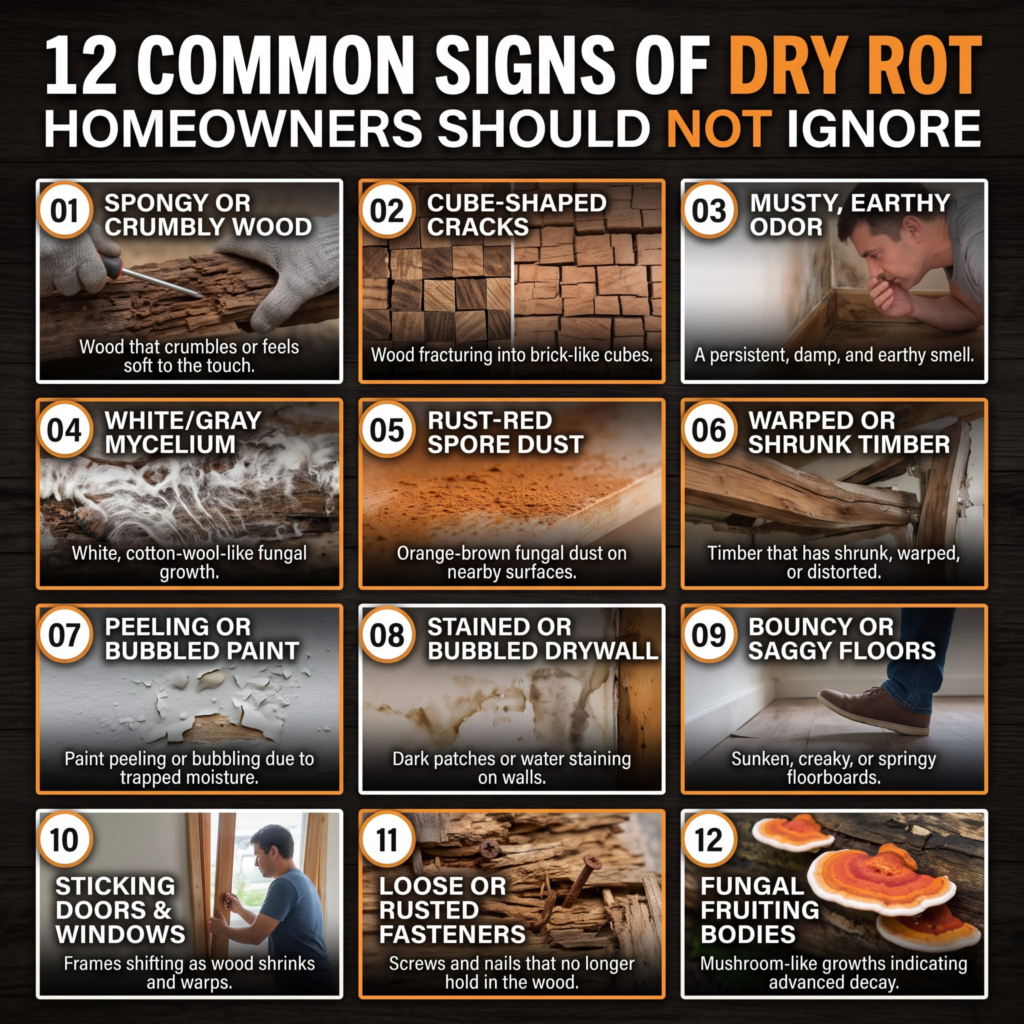
12 Common Signs of Dry Rot Homeowners Should Not Ignore

12 Common Signs of Dry Rot Homeowners Should Not Ignore Many dry rot repairs begin with a small visible defect. Once damaged material is opened, the real question is how far the deterioration extends and whether the surrounding framing, trim, or siding is still solid enough to remain. Homeowners often use the term dry rot to describe deteriorated wood found around the exterior of a house. The important practical issue is not the label; it is whether moisture has weakened the material and whether the source of that moisture has been corrected. What Usually Causes the Problem? Horizontal surfaces and exposed end grain absorb moisture more readily than well-protected vertical faces. That is why lower trim edges, sill ends, deck cuts, fascia joints, and post bases deserve extra attention during inspection. Signs to Look For Open joints and failed caulk: Gaps around trim, windows, doors, and siding create direct paths for water. Damage below gutters or roof edges: These locations can point to overflow, leaking seams, or uncontrolled runoff. Swollen or distorted boards: Wood that stays wet can cup, swell, split, or separate at joints. Dark staining or discoloration: Stains do not always mean rot, but they are a reason to inspect the area more closely. Peeling, bubbling, or cracked paint: A failing finish can allow water in, and it can also be a symptom of moisture escaping from behind the surface. Loose trim or fasteners: Movement may indicate that the wood around nails or screws has deteriorated. One sign by itself does not prove that the wood needs replacement. The goal of an inspection is to determine whether the material is still sound, how far any deterioration extends, and where the moisture is coming from. Why the Moisture Source Matters for Exterior Wood Horizontal surfaces and exposed end grain absorb moisture more readily than well-protected vertical faces. That is why lower trim edges, sill ends, deck cuts, fascia joints, and post bases deserve extra attention during inspection. For homeowners comparing estimates, it is useful to ask how the contractor plans to handle hidden damage, flashing, sealant, priming, painting, and disposal. Two estimates can look similar in price while covering very different scopes. What a Proper Dry Rot Repair Should Address Open the damaged area carefully. Removing trim, siding, or finish materials exposes the true boundaries of the deterioration. Restore flashing and water-shedding details. Where applicable, flashing, drip edges, joints, or drainage details are corrected so water is directed outward. Inspect nearby material. Adjacent boards and framing should be checked because decay can extend beyond the first visible spot. Repair or replace affected carpentry. The damaged section is rebuilt with appropriately sized and detailed material so the surface and support are restored. Identify the moisture source. Before new wood goes in, the repair should determine how water reached the area and what needs to change to keep it dry. Seal and protect exposed surfaces. Cut ends, joints, and compatible repair materials should be prepared for primer, paint, sealant, or another protective finish. Not every project uses every step, but the sequence is important: find the water path, expose the damage, remove unsound material, rebuild the affected area, and restore the protective details that help the exterior shed water. How to Reduce the Chance of Future Wood Rot Adjust sprinklers so they do not spray siding, posts, trim, decks, or doors. Keep gutters clean and confirm that water exits through the downspouts instead of spilling over fascia. Inspect deck boards, railings, stair connections, and ledger areas for places where water sits. Repair small gaps early. A narrow opening at a joint can become a repeated path for water. Keep soil, mulch, and dense vegetation from trapping moisture directly against exterior wood. Watch roof-to-wall and window transitions for staining that may indicate a flashing problem. Maintenance does not guarantee that wood will never deteriorate, but it can reduce repeated moisture exposure and make small defects easier to catch before they become larger repairs. When to Call a Contractor If the area feels soft, the damage is near a window, door, roof edge, deck connection, structural member, or the same spot keeps failing after previous repairs, it is reasonable to have the area evaluated professionally. Opening the right section carefully can reveal whether the issue is limited to finish material or extends into surrounding framing. Need Dry Rot Repair? If a repaired area keeps failing or you are not sure how far the damage extends, Elite Construction and Remodel can inspect the area and explain the repair options. Company: Elite Construction and RemodelService: Dry Rot & Exterior Wood RepairArea: Sacramento Area

12 Common Signs of Dry Rot Homeowners Should Not Ignore Read More »